How to Create Graphical Table Layout
How to Create Graphical Table Layout

Vendtill Back Office
Vendtill POS offers a powerful Graphical Table Layout feature that allows restaurants and cafes to manage floor plans visually. This guide walks you through activation, customization, and adding tables to receipts.
Special Notes
- This feature is currently available on Android and Web POS, operates in landscape mode, and requires an internet connection.
- You cannot use standard and graphical layouts simultaneously. If you switch layouts with QR ordering activated, reselect tables and regenerate QR codes.
- For optimal experience, use screens 10 inches or larger.
- The term “Reservation / Table Room” in older versions is now called “Service Area”.
About Graphical Table Layout
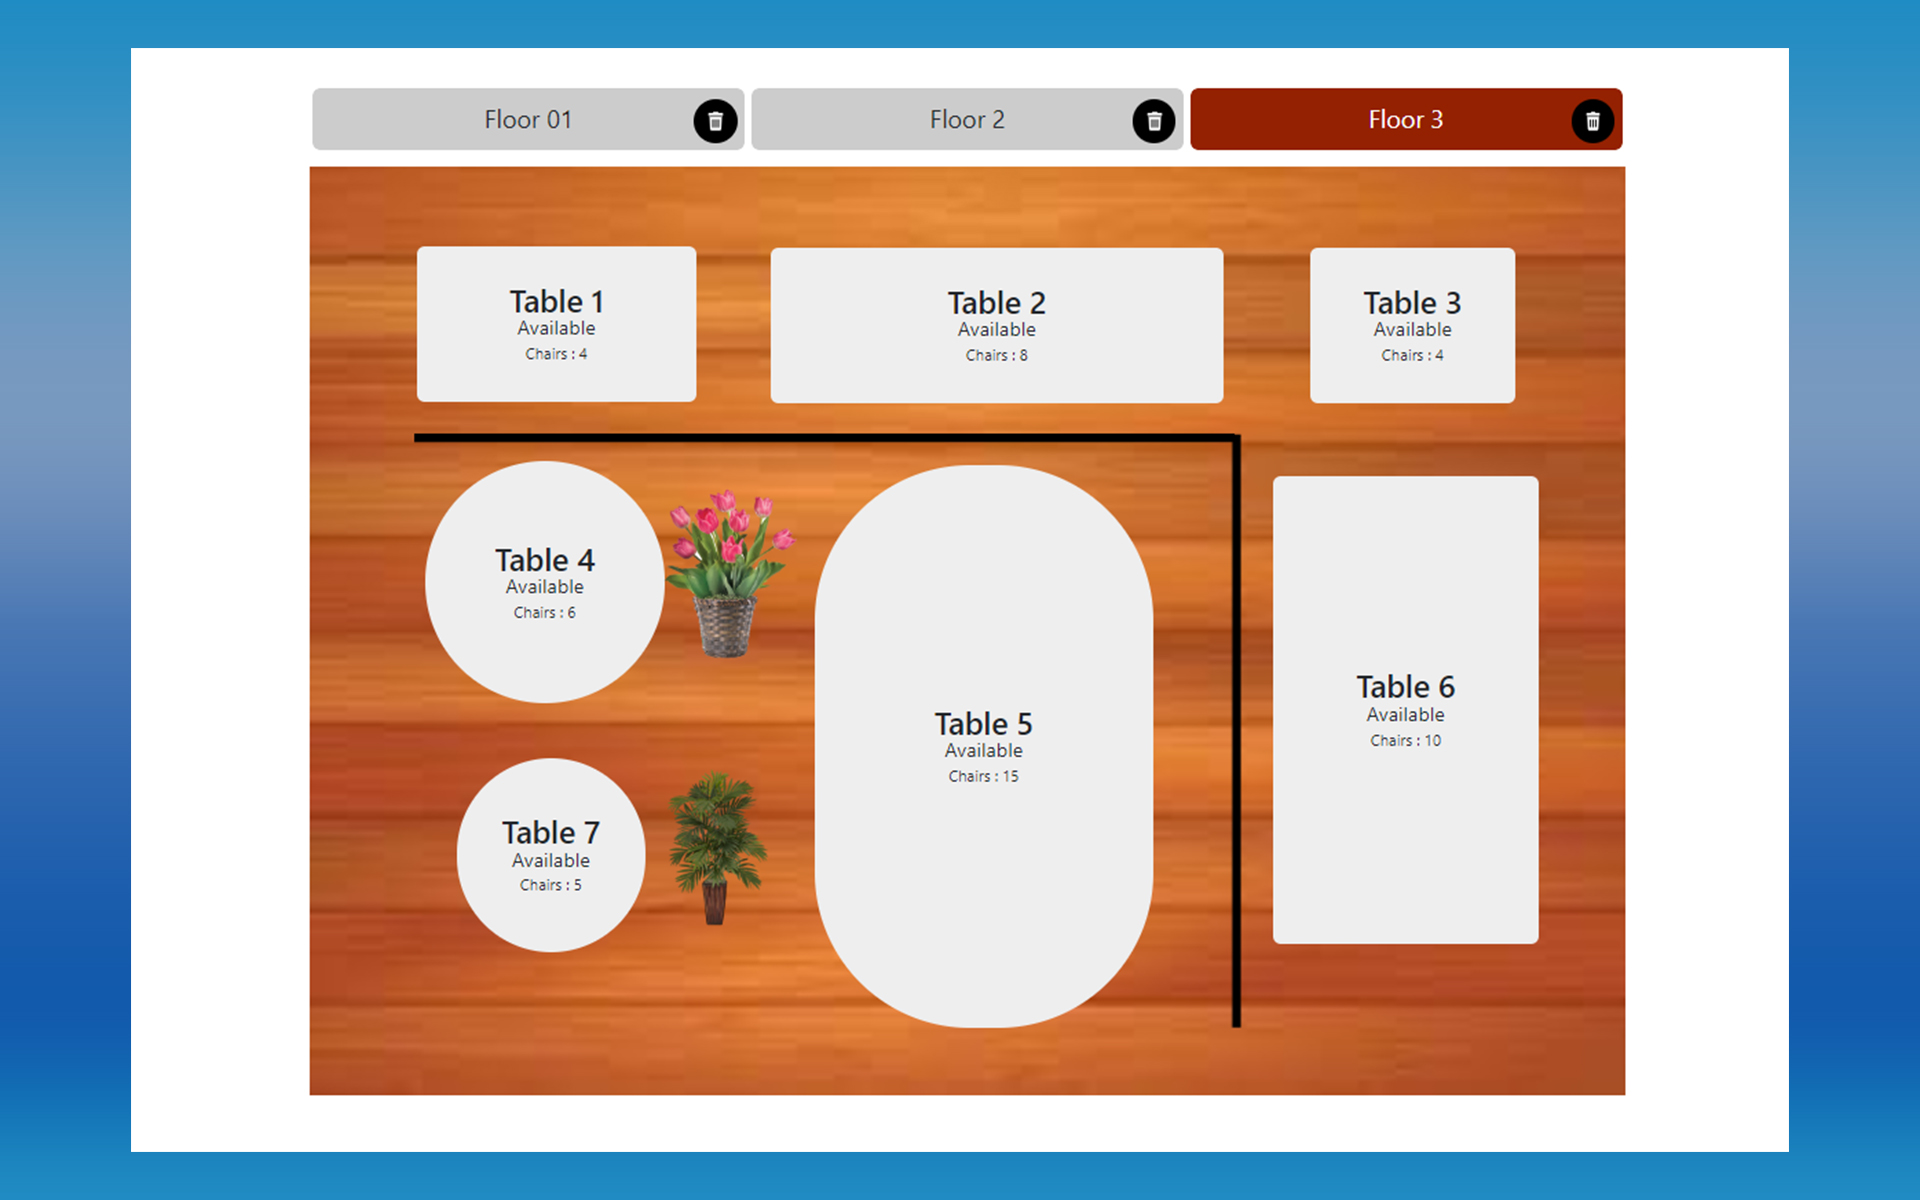
The Graphical Table Layout provides a visual interface to design and manage restaurant floor layouts with advanced customization. For multi-floor setups, managers can efficiently organize seating, decorations, and table arrangements.
Activation
To activate Graphical Table Layout:
- Navigate to Back Office > Settings > Feature > Reservation.
- Enable the feature, and it will appear in the POS app main billing interface as a Table Icon.
Interface Overview
Clicking the EDIT button unlocks the following tools:
- Floor: Create and manage multiple floors.
- Table: Add tables, choose shapes (square/round), set chair count, drag, resize, and rotate.
- Decoration: Add separators or decorative icons.
- Rotate: Adjust alignment for tables or decorations.
- Delete: Remove unwanted elements.
- SAVE: Save changes to the layout.
- Preview: Visualize the layout before finalizing.
Step-by-Step Layout Setup
- Create Floors according to your establishment’s levels.
- Add Tables: Choose shape, chair count, and arrange as needed.
- Add Decorations for visual clarity and aesthetics.
- Use Rotate and Delete to fine-tune the layout.
- Save and Preview changes to confirm the layout.
Table Status Color Indicators
- White: Available / unoccupied tables.
- Red: Occupied tables.
- Yellow: Selected or highlighted tables.
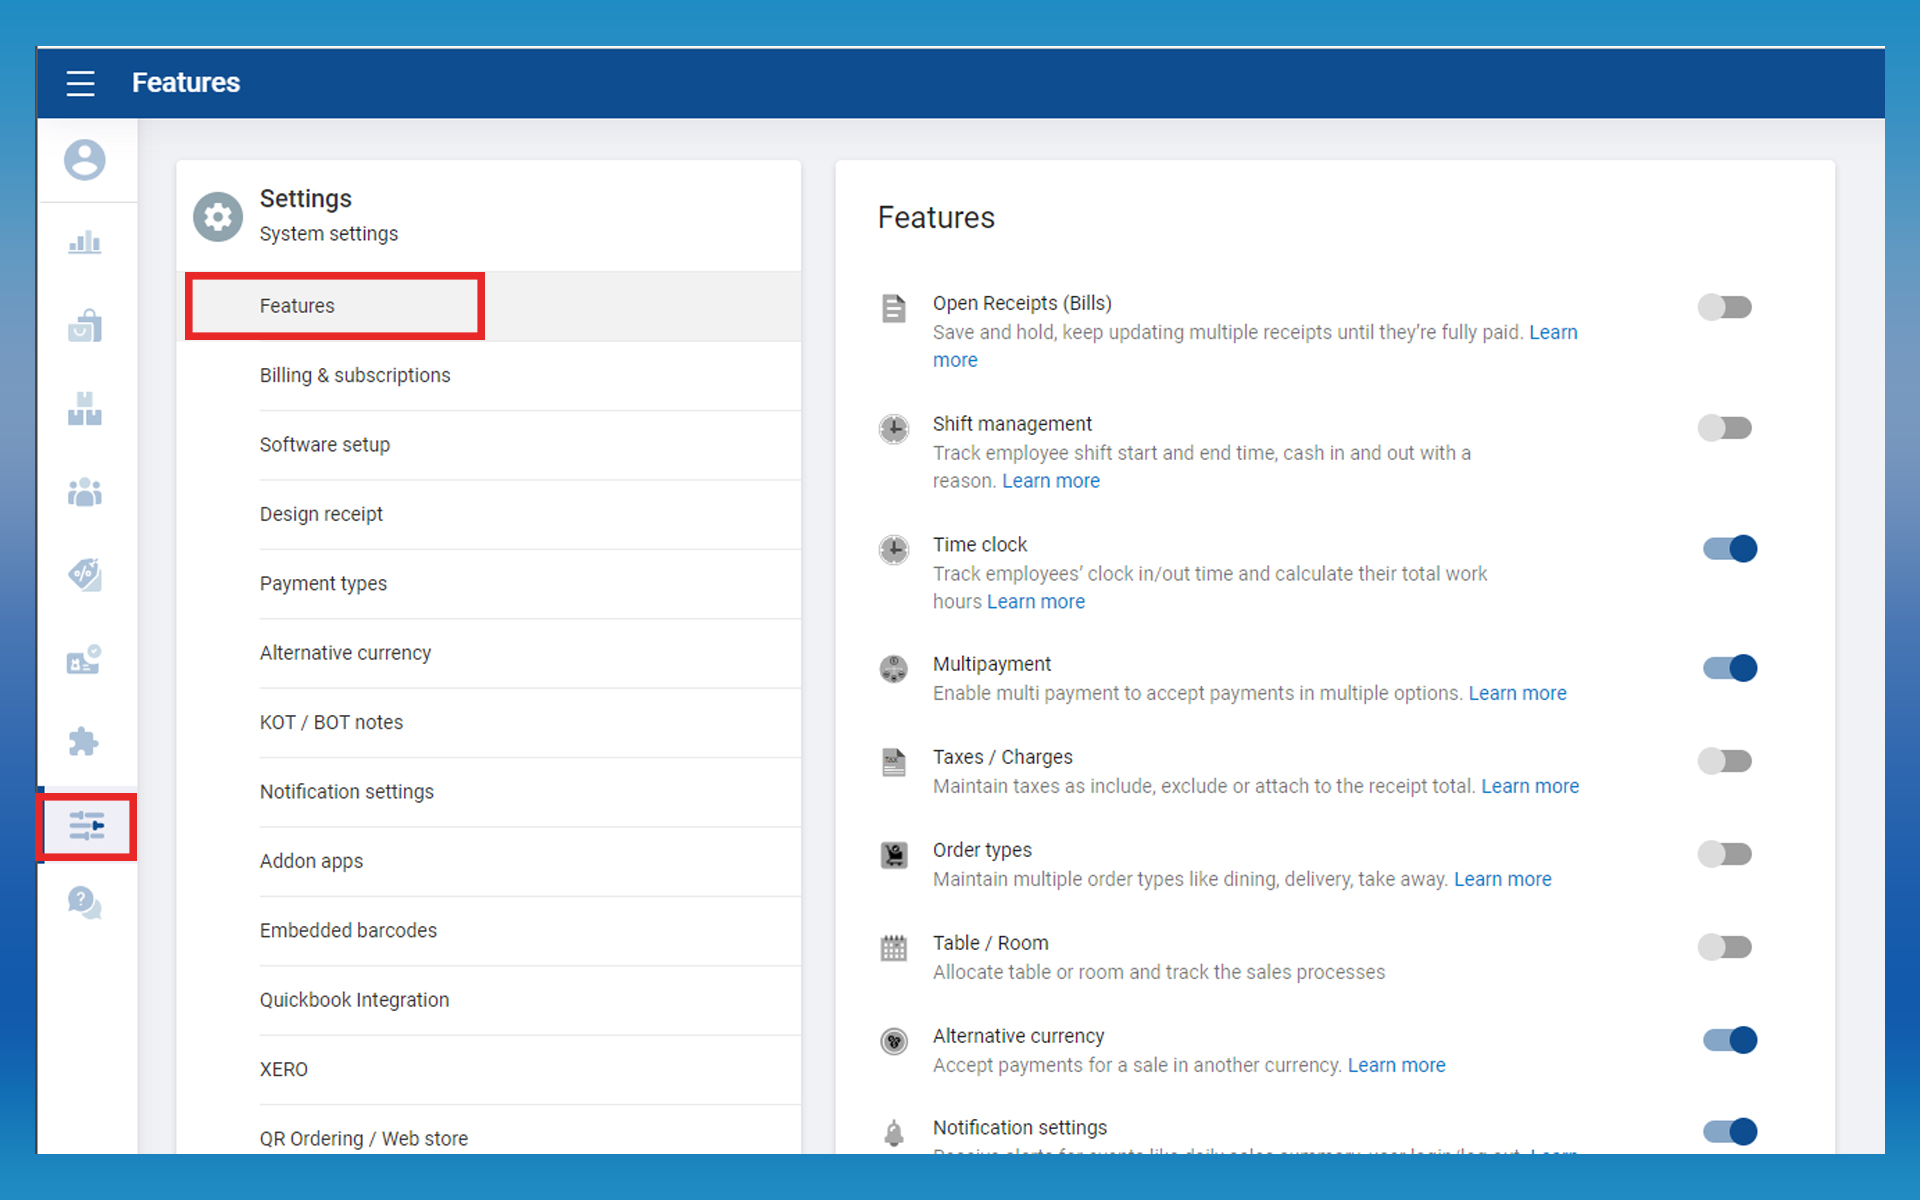
Step 1: Activate Service Areas
- Login to POS Back Office > Select Settings > Go to Feature.
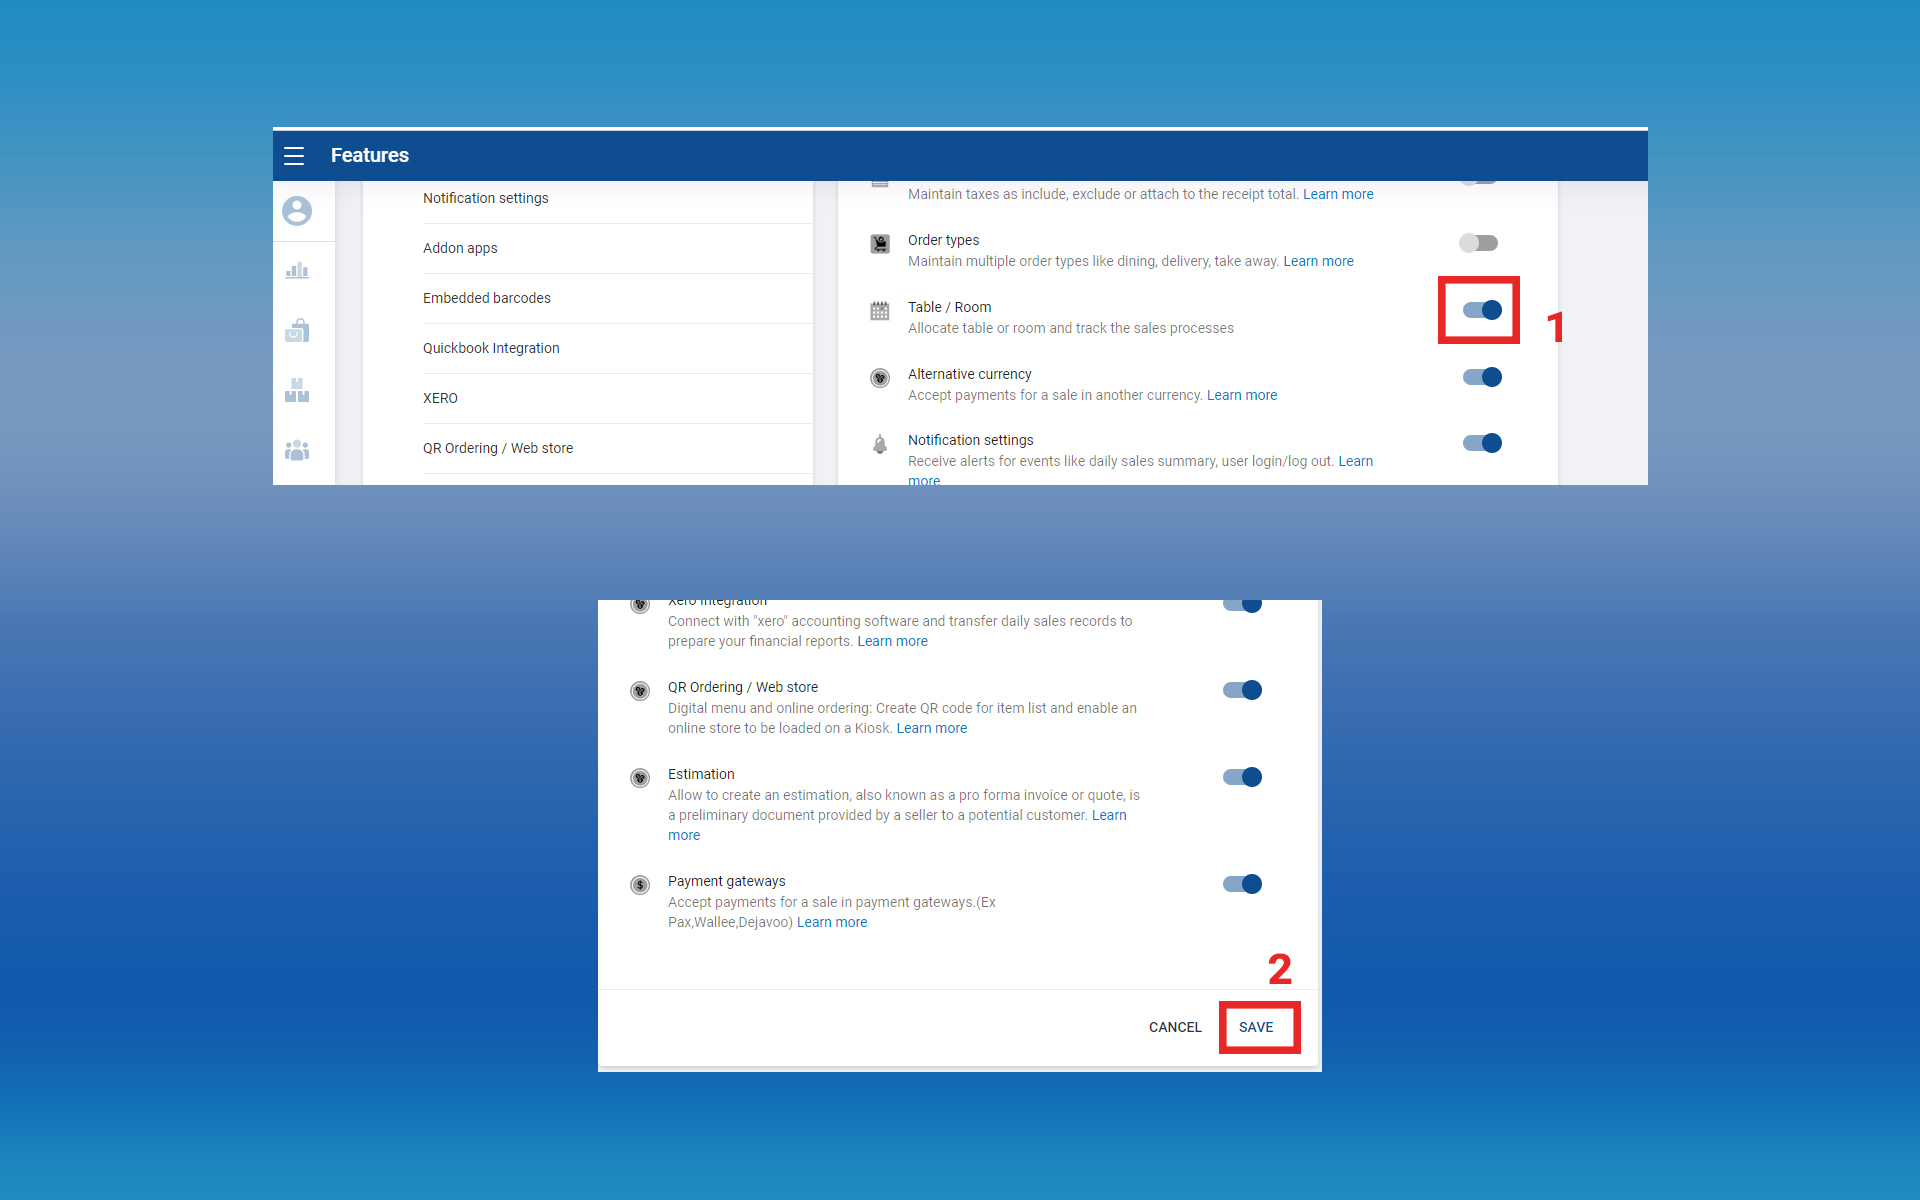
- Tick Service Areas > Click Save. It will appear as a sub-menu in Settings.
Step 2: Enable Graphical Layout
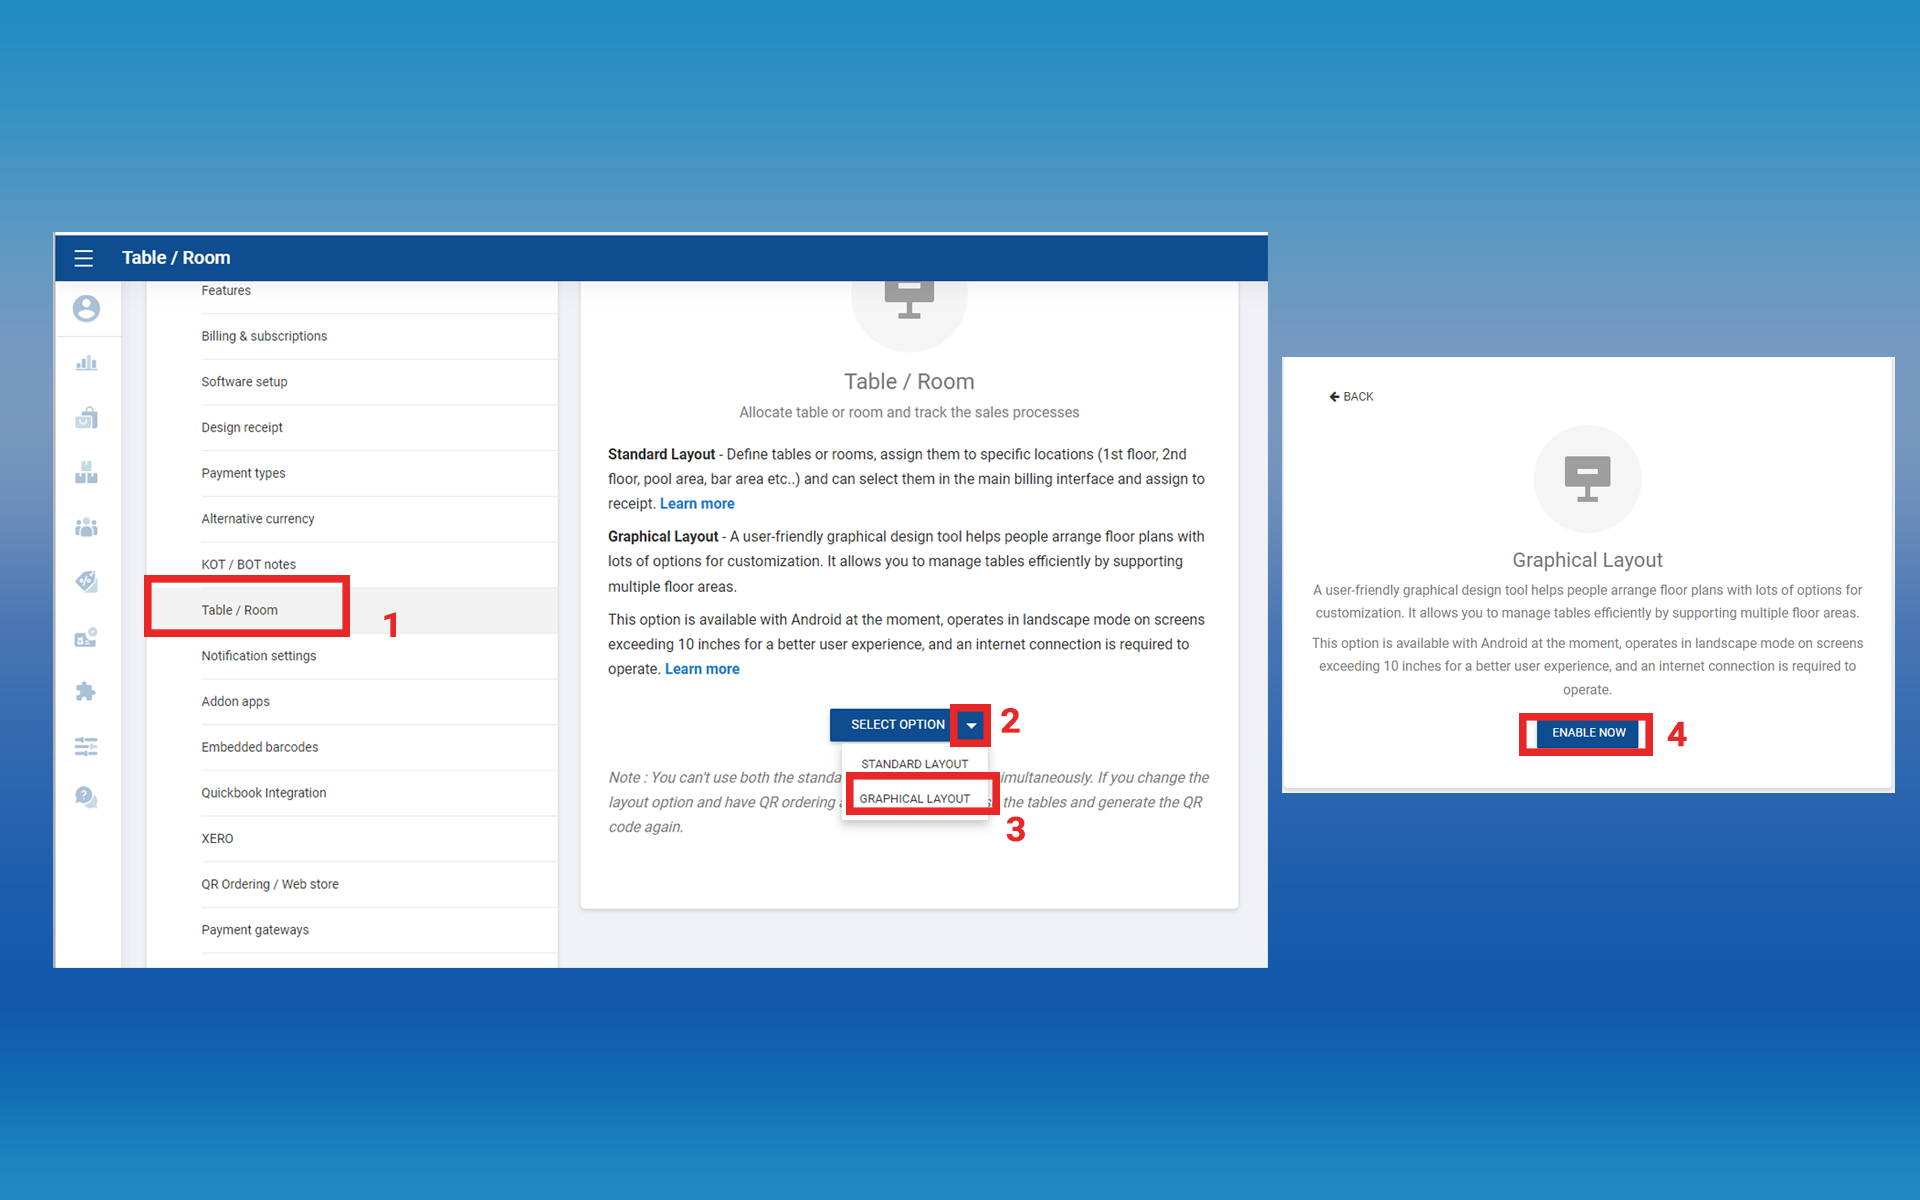
- Click on Table / Room feature > Select Graphical Layout from the dropdown > Click Enable Now.
- It will appear as a Table Icon in the POS app’s billing interface.
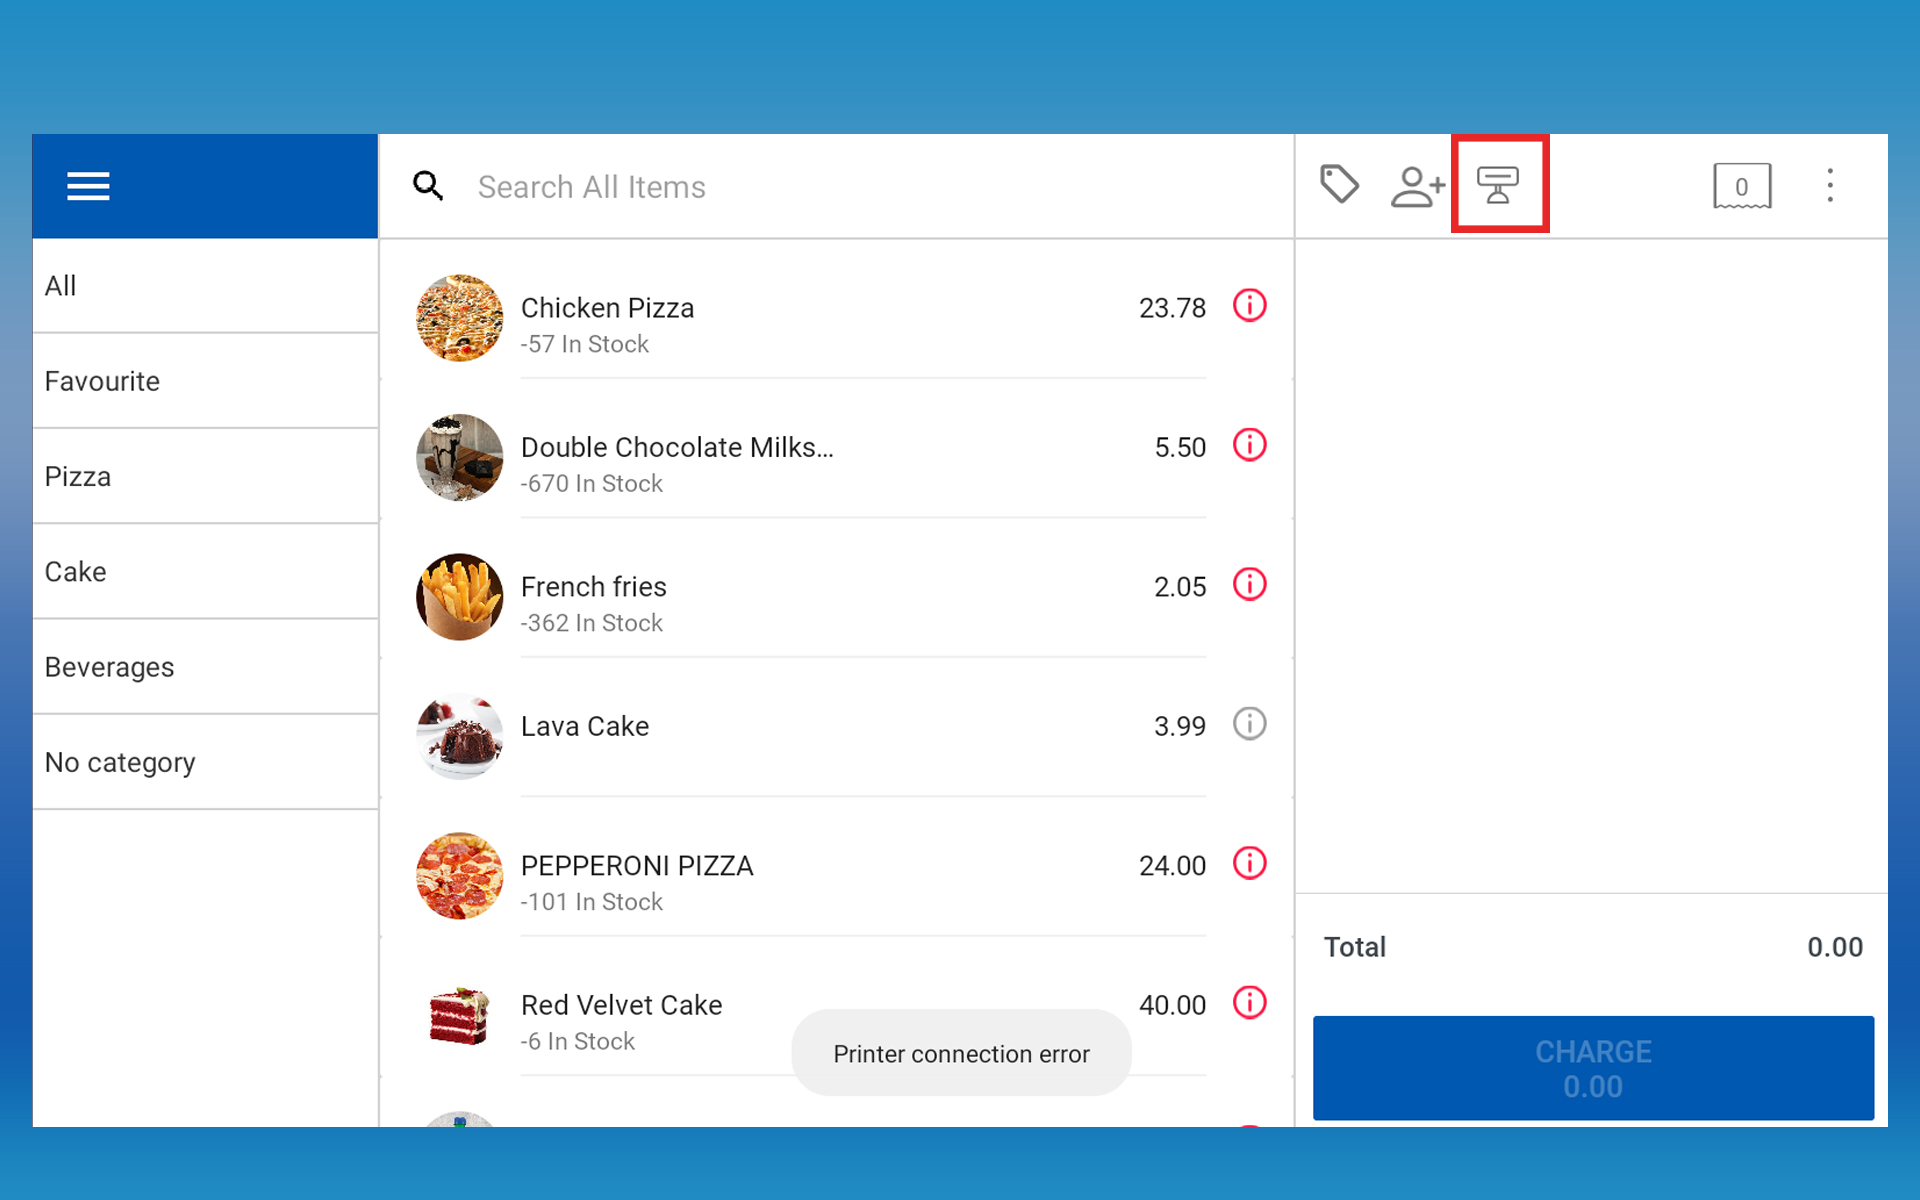
Step 3: Create Tables and Floors in POS
- Click Edit > Use Floor to create floors.
- Use Table to create tables.
- Use Decoration to add decorative elements.
- Click Save to store changes.
Step 4: Add a Table to a Receipt
- POS App main menu > Select New Sale > Click the Table icon.
- Click an available table (White color).
- Select items the customer ordered > Click Save.
- To add more items: Click Open Bills, select the table, click Edit, add items > Click Update.
- To finish the receipt: Click Open Bills, select the table > Click Charge.
Related Articles
How to Set up Table Layout
Standard Table Layout Setup Process Vendtill Back Office > Settings > Features > Reservations 1. How to Enable Table Layouts This feature allows businesses to manage reservations for resources such as rooms, tables, and seats, helping to schedule and ...Default Table View
Start From Table View Feature in Vendtill POS Step-by-step guide The "Start From Table View " feature in Vendtill POS allows users to set a predefined table layout as the main interface for the POS system. This layout will be the default view before ...Service Areas
Service Areas (Reservation Tables / Rooms Etc..) Step-by-step process The "Service Areas" feature is a feature that helps businesses to manage their reservations more effectively. This feature is designed to handle various resources such as rooms, ...Let's Create Categories and Sub Categories and Assign Products
1. Go to POS app main menu and select products 2. Select ‘Products’ and click the plus button to create a product. 3. First enter the name of the product 4. Enter the ‘Selling price’ 5. Upload an image You can add an image of the product which helps ...Vendtill Web POS – Retail Layout
Vendtill Web POS – Home Screen Layout & Quick Cash Option Step-by-step Vendtill Web POS allows businesses to customize the home screen layout to meet specific operational needs. This flexibility ensures enhanced usability, improved workflow, and ...